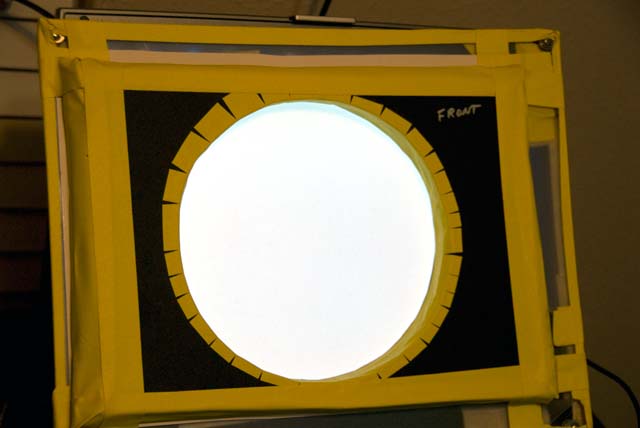
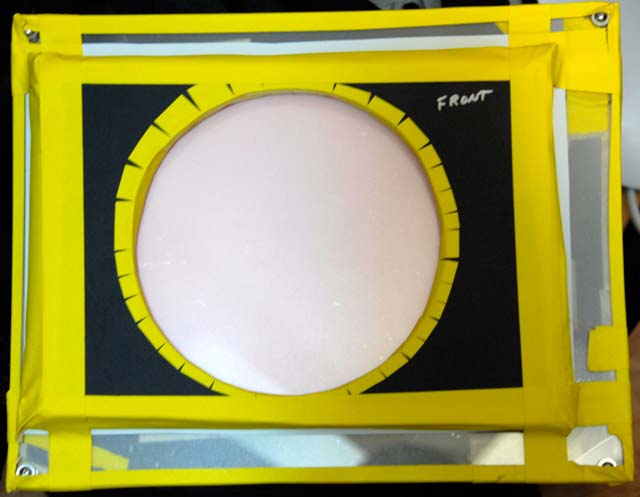
EL Panel Rig Flatfielding Lightbox Rig
This page contains information about may other 'scope(s), binoculars, etc. My main astronomy equipment page is here.
Left/Top is on, right/bottom is off. Constructed from two 11x14 sheets of clear plastic, one covered with a sheet of translucent window film, gaffers tape, and black foamboard. I sandwiched an A4 sized EL panel from glowhut between the plexiglass, and fastened the two sheets together with small stainless nuts/bolts/washers. I used the gaffers tape to cover all the wires and to fasten the transformer to the back (not shown). I glued 4 sheets of foambard together, and cut the foamboard with a jigsaw to fit over the front of my telescope snugly. I then used gaffers tape to fasten the foamboard to the plexiglass, and sealed the edges with more gaffers tape to help keep the black flakes from the foamboard under control.
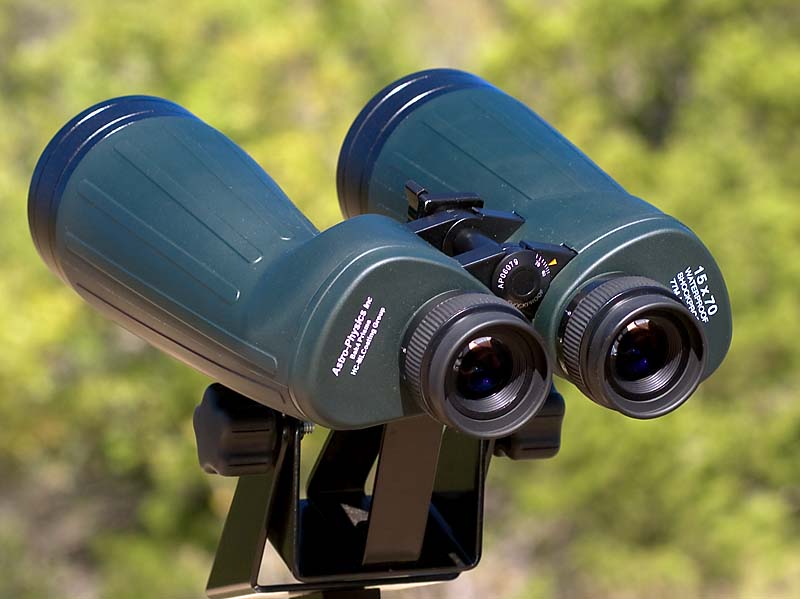
Here are a few quick takes on the AP 15x70's.
They are quite heavy and I couldn't hand-hold them for anything other than very brief periods. Optically they are very good. I found that if I have the moon's limb centered in the FOV there's no trace of false color, but about 1/4 to 1/2 away from center a trace of false color will begin to appear. The ep focus is quite stiff, and difficult to adjust on my light-ish tripod setup (Bogen/Manfrotto 410 gear tripod head and Bogan 3401 tripod) due to vibration. The supplied tripod adapter doesn't tighten down but this is a non-factor in actual use. Star quality seems quite good.
I briefly had a pair of fujinon 16x70's some time ago, and these seem very similar in quality and size/weight. The included case is a nice touch.
I had a chance to compare these to the AT66ED refractor (see below) "side by side" with a Plossl EP that gave just about the same magnification. The views were very similar. I compared M45, and basically all the stars I could see in the refractor I could see in the binocs and vice-versa. The thing I noticed most was how easy it was to focus the refractor versus the binoculars! Of course, you want to "set and forget" the focus on the binos.
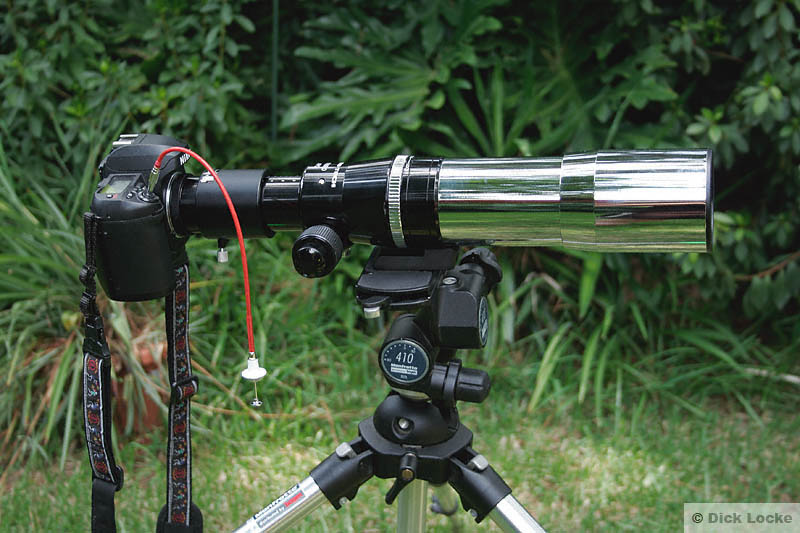
This summer 2006 acquisition is a small, inexpensive, but good quality refractor. It's offered by Astronomics, and seems comparable to the small Williams Optics 66mm scopes that were favorably reviewed in one of the astronomy magazines. The problem with the Williams Optics version is that nobody seemed to have them to sell, where Astronomics just received 300 of these in various colors. They sell for $329 plus ground shipping. There is no diagonal or eyepiece included in that price.
This is nominally an APO (apochromatic) scope, and I agree with that designation. I could find little if any false color of the moon with a wide variety of eyepieces. In my initial use I've only seen a trace of color when using a 3.6 mm EP on Jupiter. This is 111x magnification, which is over the listed highest practical power of 100x. I used a Takahashi 1.25" diagonal, along with a variety of eyepieces: generic 20mm & 10mm plossls, 18mm TeleView Radian, and Takahashi 5mm and 3.6 ED. Note the 18mm Radian did not come to focus with this setup, there was not enough backfocus. A work-around was to lift the EP up a bit in the diagonal.
There's a very nice review of this scope at "Cloudy Nights." I have used this scope with a Nikon D100 DSLR camera and a Bogen/Manfrotto 410 gear tripod head and Bogan 3401 tripod. With legs fully extended, this setup can comfortably handle this much weight, but it is pushing the upper weight limits. While it would be fun to put my 2" diagonal on, that extra weight would scare me.
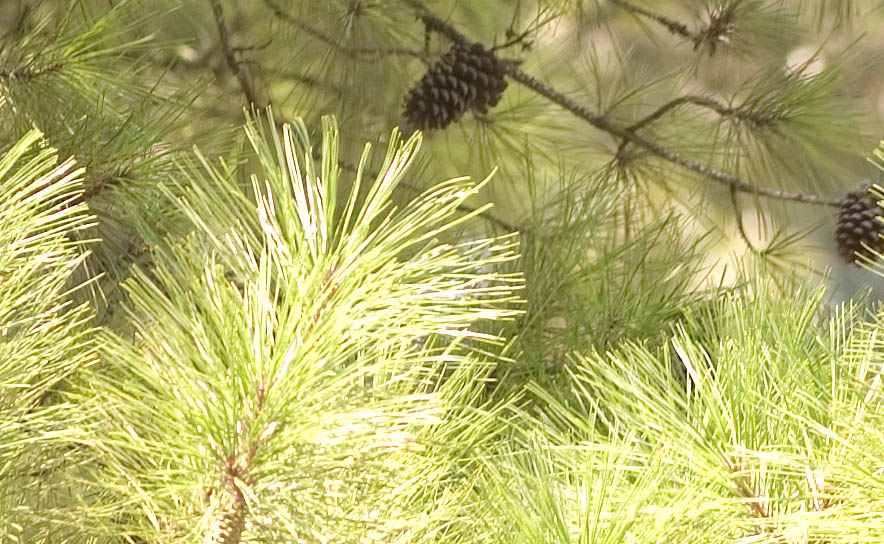 False Color Well-Controlled The shot above is in challenging lighting conditions, with the very bright needles being next to fairly dark areas. Of course, the real test will be with Astronomical objects. Nikon D100 and AT66ED telescope. | 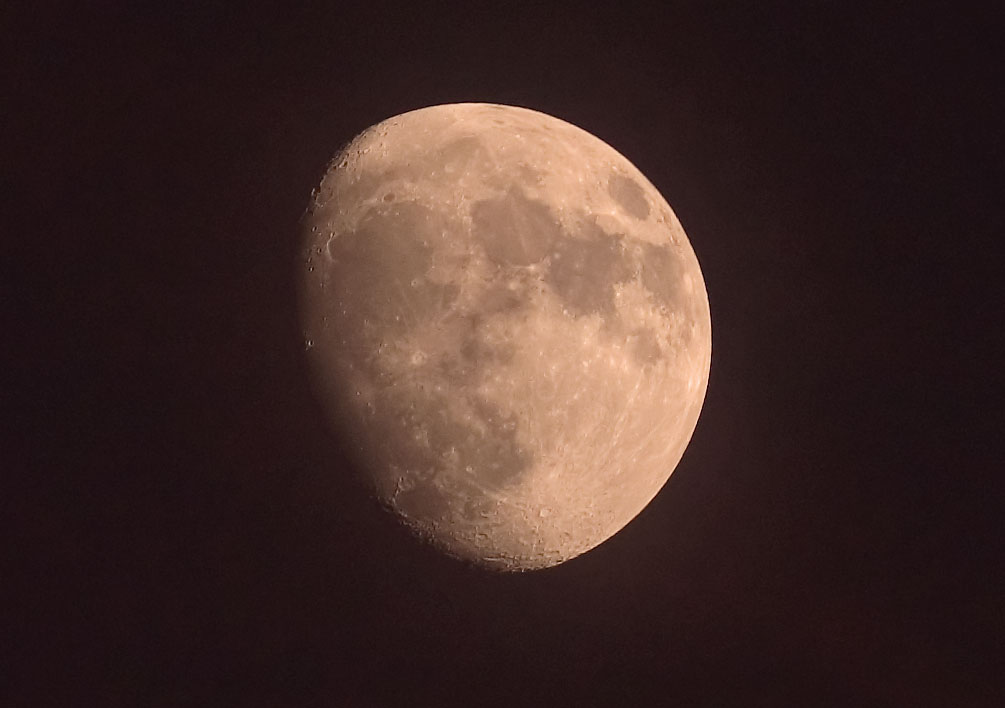 First Astrophotograph with AT66ED, prime focus, on a hazy evening with thin clouds in the area. Not bad! |
| Right: this comes to focus. The rightmost picture shows the breakout of the parts that bring the AT66 into focus with a DSLR camera. The 2" Televue SCT adapter screws to the scope, than the large tube from the Meade adapter noted below, a T-ring, and the DSLR. | 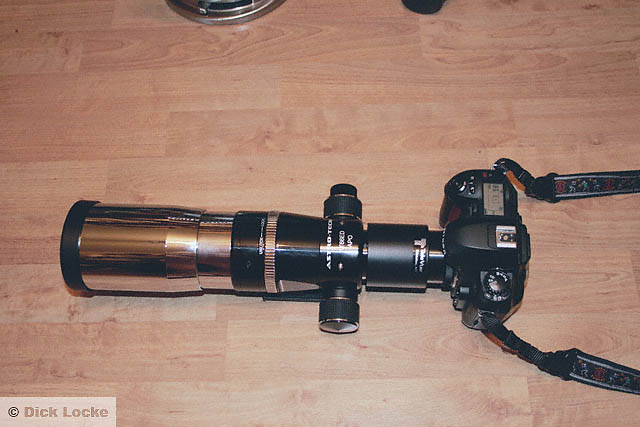  |
This telescope can but used as a camera lens, what's called "prime focus" photography. I discussed the adapter's I'd need with the sales person, and purchased a Meade adapter 07361 and a Televue SCT Adapter ACC-0003. However, the adapter alone would not come to focus using the "short" configuration of the adapter as shown in the instructions. (needs to go back about 1/2 to 1 inch further for focus). It turns out there's a way to use both the parts to get a camera to focus position. I should note that the shortest focusing distance was around 17 feet or more from a quick test. With a little more extension you can get even closer if needed. Since I do so much photography I'm going to try to find something that will give me another inch of backfocus.
Quoting the Astronomics Web site, the Astro-Tech telescope has:
•included 66mm f/6 ED refractor – chrome optical tube, dual-speed 11:1 fine focus, hard case 66mm f/6 fully multicoated ED glass apochromatic refractor optics
• dual-speed Crayford focuser with 11:1 ratio fine focusing
• combined dovetail/tripod bracket for use on a photo tripod or a German equatorial mount
• amazing wide field astrophotographic capabilities
• long-lasting hard anodized chrome finish with black trim
• aluminum-frame foam-fitted hard carrying case
• two-year warranty
Experience so far: Aside from the fine optics, the overall quality of this scope seems to be quite high. Out of the box, everything was in good order. I should note that the focuser seemed to slip very easily, and later I found that one of the allen screws that holds the focuser was loose. I spent a while checking what all the screws did, and think I found a good "tightness" to everything. Other than that, I have no complaints. The focuser seems very smooth now that I have it properly adjusted. A good quality scope all around.
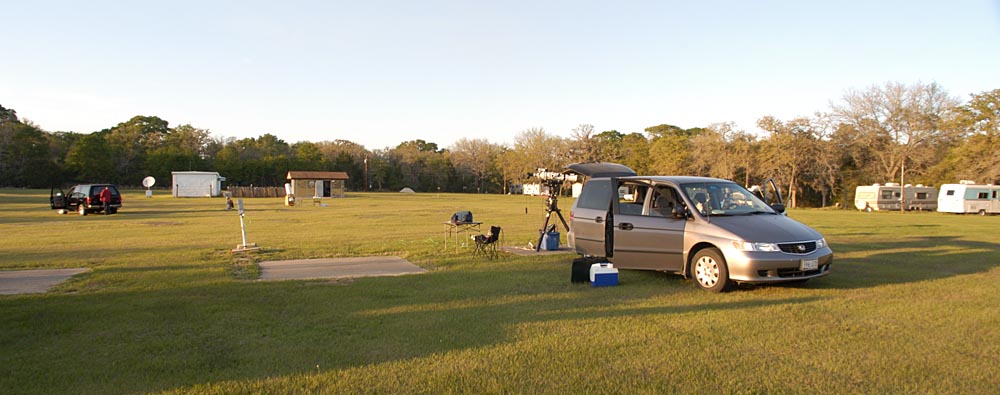
Facing North (Car Facing South)

Note the van's tailgate is blocking the sun from the camera's position. You can also see some of the wiring. I run 8 gauge (thick) cables from two deep cycle batteries to my 12 volt accessories. Most of this juice goes to the dew heaters. The auto-guider also slurps the juice.
Last weekend (11/05/04) I spend a lot of time fighting dew on my TOA 130. (I'm in the Houston TX area where heavy dew is a fact of life.)
What I found was that a Kendrick dew strip mounted on the OTA, turned all the way up, was not able to keep up with dew in continued 100% humidity. I mounted a second strip on the dew shield, blew the dew off with one of those 12v hair dryers, and found that both strips, full on, kept the dew at bay.
Later on, looking at M42 about 35 degrees off the horizon, the image was swimming a bit. I turned down the dew heaters to see if maybe they were causing the problem. I never figured that out, but I did figure out that the objective dewed up again.
Update 12/04: I had good luck with the Just-Cheney dew shield and a Dewbuster controller. The only problem I had was running out of juice on the second night while running the mount, STV autoguider, and fighting off a heavy dew. It calls to attention my need for more juice.
Power: I now use two Sun Xtender PVX-840T AGM PVX-840T batteries purchased from Arizona Sun and power. At $150 they're not cheap, but neither is replacing lesser batteries after less than 2 years and having imaging session ruined...
Longer power story: Having plenty of remote power in all night, heavy dew has been a challenge for me as long as I've done this at some dew-prone sites in the Houston,TX area. And as others mentioned, if you try this two or three nights in a row you may not be able to get recharged.
Regarding power, I had a series of problems with deep cycle batteries from WalMart/Sears. Basically, they all died premature deaths after a year or so -- probably due to both my heavy demands and surviving the Houston Heat. (I was remiss in refilling the cells of at least one of my batteries, which I'm sure didn't help that one.) The last sears battery I bought was supposed to be 75 amp hours, but absolutely could not handle my max current drain of 5 or 6 amps for more than 3-5 hours. It turns out that the rate of discharge of a battery is critical to howm many amp hours you can actually get out of it. The faster the drain, the fewer the usable amp hours. So even if you "only need" 60 amp-hours for a night of imaging, most 75 amp hour batteries are not going to be able to deliver that power quickly enough.
My equipment web page (this one) has a list of excellent FAQ's on deep cycle batteries (just below). I ended up getting two Sun Xtender AGM PVX-840T batteries. These are Absorbed Glass Mat type, which are 2-3 x more expensive than regular deep cycle batteries, but a few hosed-up imaging sessions with cheap/dead batteries convinced me that quality batteries are a reasonable investment. With these two batteries I can basically go "full on" for two straight cold, dewy nights.
-Dick Locke
p.s. Regarding generators: Our club's former site did not have power, and generator use was common. While I find a quit, properly placed generator (well away from people and down-wind) to be tolerable, there is no question I would prefer the sound of silence.
I'm not satisfied with the quality of the stars on my G11 with the TOA 130 and ST80 guiding as shown above. While I get usable shots, on close inspection I frequently have oblong stars due to apparent guiding errors. It's been a constant battle. I did change to the high precision worm and it didn't make anything worse, but may not have been a noticeable improvement. I've only been out with the new worm 2 nights. My problems are worse when I image southern objects. I had read someone's recommendation that it really helps to significantly imbalance the load. I did some testing in the back yard Saturday night and watched the tracking , and imbalancing really helped, and the more the better (almost until the mount stalls).
I've had other advise to make sure the mount is perfectly polar aligned, and this makes sense as I seemed to have some dec tracking issues. It's hard to get exactly balanced in dec when using the side by side setup. I have a TOA 130 and a ST80 guidescope with STV head, so I know I'm heavily loading the mount. I need 42 lbs counterweight to balance.
Fotodiox lens adapters:
| Date: Tue Nov 15, 2005 7:38 pm Subject: Re: Canon 20Da pointers for Nikon user? (lens adapter story) | il |
I ended up buying a Nikon lens to canon body adapter. Actually, I bought two, the "consumer" model and the pro model. I was able to get the consumer model on and off a Nikon lens without too much difficulty. I had a hell of a time with the pro model. I got it on, but couldn't get it off. I was glad I didn't put it on my most expensive lens first! I was convinced the adapter was defective. Of course, there are no instructions of any kind... I called fotodiox the next day and told them I couldn't get it off. They were helpful. While they were working on it, I finally figured out the lever to use to get it off. I found it extremely difficult to get off; it got jammed and it's really difficult to operate the lever and turn the adapter at the same time. I did finally get it off the next day. The guy at fotodiox said that the pro model was more like something you'd want to put on and leave on. I would agree! ...there |
Copyright © 2004, 2005 by Dick Locke. All Rights Reserved. Contact and Image Use Information
hits since 12/27/2004 update.